🦴
🦴
🦴
Switch & Treat.
Switch & Treat.
Switch & Treat.
My Role: UX Designer
Timeline: 3 months
Tools: Illustrator, laser cutter, paint, wood, 3D Printer, motor, acrylic, battery pack, battery interrupter, glue
Skills Involved: User Interview, Skills Assessment, UX Design
Overview: Switch & Treat was an assignment under Tufts’ Assistive Technology course in which groups consisting of an Occupational Therapy and Human Factors Engineering student were tasked with creating an assistive technology device based on the specific needs of a disabled user in the greater Medford community. For this assignment, my group designed and created a switch-activated dog treat dispenser for a wheelchair user with cerebral palsy.
Challenge: The objective of this project was to design and build a switch-activated assistive technology device that would allow our disabled user to feed her dog independently.
My Role: UX Designer
Timeline: 3 months
Tools: Illustrator, laser cutter, paint, wood, 3D Printer, motor, acrylic, battery pack, battery interrupter, glue
Skills Involved: User Interview, Skills Assessment, UX Design
Overview: Switch & Treat was an assignment under Tufts’ Assistive Technology course in which groups consisting of an Occupational Therapy and Human Factors Engineering student were tasked with creating an assistive technology device based on the specific needs of a disabled user in the greater Medford community. For this assignment, my group designed and created a switch-activated dog treat dispenser for a wheelchair user with cerebral palsy.
Challenge: The objective of this project was to design and build a switch-activated assistive technology device that would allow our disabled user to feed her dog independently.
My Role: UX Designer
Timeline: 3 months
Tools: Illustrator, laser cutter, paint, wood, 3D Printer, motor, acrylic, battery pack, battery interrupter, glue
Skills Involved: User Interview, Skills Assessment, UX Design
Overview: Switch & Treat was an assignment under Tufts’ Assistive Technology course in which groups consisting of an Occupational Therapy and Human Factors Engineering student were tasked with creating an assistive technology device based on the specific needs of a disabled user in the greater Medford community. For this assignment, my group designed and created a switch-activated dog treat dispenser for a wheelchair user with cerebral palsy.
Challenge: The objective of this project was to design and build a switch-activated assistive technology device that would allow our disabled user to feed her dog independently.
My Approach:
Step 1: User Interview & Skills Assessment
To understand the problem, we conducted initial interviews with both the user and her family in order to identify potential solutions and gather further insights. As an adult woman with cerebral palsy, our user was already familiar with assistive technology since she had an alternative communication device (AAC) for speech and an electric wheelchair for mobility. However, due to her disability she lacked the motor control to feed treats to her family dog, Popeye, by hand and as a result only could do so with physical assistance from others. She wanted to be able to do so on her own, but was unable to find a product that would allow her to since no dog treat feeders are activated by the switch she used. We also conducted a skills assessment in order to gain an understanding of her sensory, motor, cognitive, perceptual, communicative, and social emotional abilities as they were affected by her condition. With these insights in mind, we began sketching initial prototype designs.
Step 2: Research & Initial Prototype Designs
Our initial design ideas were inspired and informed by our research into dog treat dispensers, gumball machines, and switches.
Step 3: Prototyping & Designing
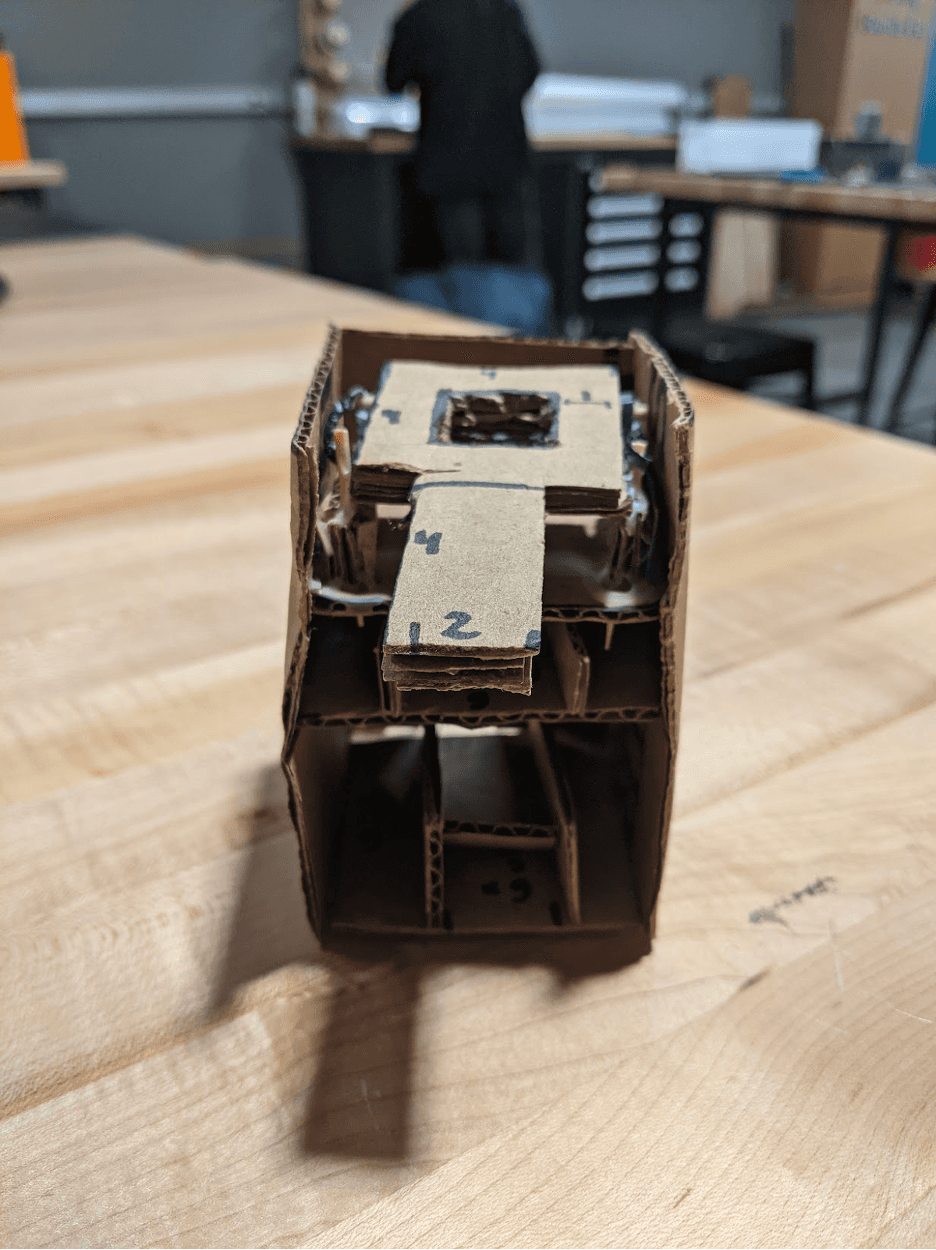
We began the initial prototyping process after deciding to build our design from scratch and made a cardboard mini-gumball machine in order to serve as the base of the dog treat feeder. After testing this initial prototype manually, we adapted it to be switch-activated. By designing and adding a CAM, battery interrupter, and motor, we were able to achieve this. Therefore, the operation of the device would occur as follows:
1. User presses & holds switch
2. Battery interrupter connects switch to batteries & motor
3. Motor spins CAM & pushes in top level of feeder
4. Treat falls through aligned holes & comes out front
After consulting with our user, we began designing and constructing the final version of our switch-adapted dog treat feeder. We were able to scale-up our prototype and use Illustrator to make drawings of the parts we needed. The final device was made of wood, 3D printed materials, a battery pack, and a motor. It was assembled using glue, screws, and soldered wires.
Step 4: Final Iteration
We customized and personalized our final design for our user, painting it her favorite color and writing her dog’s name on the front. We also added a dog bone and polka dot pattern onto the outside of the device to add an aesthetic touch. The final switch-adapted dog treat feeder was delivered to our user with a set of instructions on how to set-up and use the device along with a video tutorial. After delivery we confirmed with our user that it worked well for her and that there were no issues.
My Approach:
Step 1: User Interview & Skills Assessment
To understand the problem, we conducted initial interviews with both the user and her family in order to identify potential solutions and gather further insights. As an adult woman with cerebral palsy, our user was already familiar with assistive technology since she had an alternative communication device (AAC) for speech and an electric wheelchair for mobility. However, due to her disability she lacked the motor control to feed treats to her family dog, Popeye, by hand and as a result only could do so with physical assistance from others. She wanted to be able to do so on her own, but was unable to find a product that would allow her to since no dog treat feeders are activated by the switch she used. We also conducted a skills assessment in order to gain an understanding of her sensory, motor, cognitive, perceptual, communicative, and social emotional abilities as they were affected by her condition. With these insights in mind, we began sketching initial prototype designs.
Step 2: Research & Initial Prototype Designs
Our initial design ideas were inspired and informed by our research into dog treat dispensers, gumball machines, and switches.
Step 3: Prototyping & Designing
We began the initial prototyping process after deciding to build our design from scratch and made a cardboard mini-gumball machine in order to serve as the base of the dog treat feeder. After testing this initial prototype manually, we adapted it to be switch-activated. By designing and adding a CAM, battery interrupter, and motor, we were able to achieve this. Therefore, the operation of the device would occur as follows:
1. User presses & holds switch
2. Battery interrupter connects switch to batteries & motor
3. Motor spins CAM & pushes in top level of feeder
4. Treat falls through aligned holes & comes out front
After consulting with our user, we began designing and constructing the final version of our switch-adapted dog treat feeder. We were able to scale-up our prototype and use Illustrator to make drawings of the parts we needed. The final device was made of wood, 3D printed materials, a battery pack, and a motor. It was assembled using glue, screws, and soldered wires.
Step 4: Final Iteration
We customized and personalized our final design for our user, painting it her favorite color and writing her dog’s name on the front. We also added a dog bone and polka dot pattern onto the outside of the device to add an aesthetic touch. The final switch-adapted dog treat feeder was delivered to our user with a set of instructions on how to set-up and use the device along with a video tutorial. After delivery we confirmed with our user that it worked well for her and that there were no issues.
My Approach:
Step 1: User Interview & Skills Assessment
To understand the problem, we conducted initial interviews with both the user and her family in order to identify potential solutions and gather further insights. As an adult woman with cerebral palsy, our user was already familiar with assistive technology since she had an alternative communication device (AAC) for speech and an electric wheelchair for mobility. However, due to her disability she lacked the motor control to feed treats to her family dog, Popeye, by hand and as a result only could do so with physical assistance from others. She wanted to be able to do so on her own, but was unable to find a product that would allow her to since no dog treat feeders are activated by the switch she used. We also conducted a skills assessment in order to gain an understanding of her sensory, motor, cognitive, perceptual, communicative, and social emotional abilities as they were affected by her condition. With these insights in mind, we began sketching initial prototype designs.
Step 2: Research & Initial Prototype Designs
Our initial design ideas were inspired and informed by our research into dog treat dispensers, gumball machines, and switches.
Step 3: Prototyping & Designing
We began the initial prototyping process after deciding to build our design from scratch and made a cardboard mini-gumball machine in order to serve as the base of the dog treat feeder. After testing this initial prototype manually, we adapted it to be switch-activated. By designing and adding a CAM, battery interrupter, and motor, we were able to achieve this. Therefore, the operation of the device would occur as follows:
1. User presses & holds switch
2. Battery interrupter connects switch to batteries & motor
3. Motor spins CAM & pushes in top level of feeder
4. Treat falls through aligned holes & comes out front
After consulting with our user, we began designing and constructing the final version of our switch-adapted dog treat feeder. We were able to scale-up our prototype and use Illustrator to make drawings of the parts we needed. The final device was made of wood, 3D printed materials, a battery pack, and a motor. It was assembled using glue, screws, and soldered wires.
Step 4: Final Iteration
We customized and personalized our final design for our user, painting it her favorite color and writing her dog’s name on the front. We also added a dog bone and polka dot pattern onto the outside of the device to add an aesthetic touch. The final switch-adapted dog treat feeder was delivered to our user with a set of instructions on how to set-up and use the device along with a video tutorial. After delivery we confirmed with our user that it worked well for her and that there were no issues.




⋆.𐙚 ̊.
layla landrum